Top Tips for Fake Tanning
A beginner’s guide on how to fake tan
Don’t let the idea of being a novice put you off self-tanning. With our handy guide you can aim for a flawless result every time you tan.
Prep and Prime
Somewhat like decorating your house, put a little ‘prep work’ into your tan routine and you can expect a more professional and streak-free finish.
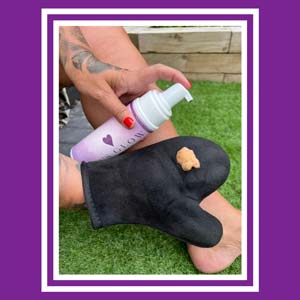
Start by preparing your skin – indulge in a full body exfoliation 24 hours prior to tanning. It’s crucial you scrub off those dead layers of skin allowing fresh new ones to buff through. To get the best results we use the LJ’s Prep & Prime cream teamed up with an exfoliating mitt.
This is also the best time to shave any hairs away that you don’t want (by shaving too close to the tanning application time you can expect a speckled and uneven look). For this reason, we recommend a shave at least 24 hours in advance to applying your tan.
Top Tip – finish this process with a quick blast from a cold shower. The cold water will help close your pores and allow the tan to smooth on.
Choose what kind of ‘glow’ you want
Whether you’re after a ‘slight sun-kissed’ look or a ‘bronzed beach babe’ glow choosing the right shade for your skin tone is crucial. Tanning newbies may prefer to start with a ‘light’ option and then work their way up to ‘medium or dark’ once they’ve decided what works best for them. Alternatively, if you really want to notice the difference or have more olive skin you may prefer to start with the medium, dark or extra dark option straight away.
We’d recommend choosing the LJ’s tanning mousse for your whole body – it’s a lightweight formula that is easy to apply and dries quickly. Perfect for tanning newbies.
If you prefer more of a gradual tan, then the LJ’s tanning drops work brilliantly when added to your regular moisturiser. With the drops you can control the depth of the tan by using as many drops as you need.
Ready to start
It’s important to remember not to apply anything else to your skin before you start using the mousse. This includes any body creams, deodorants or perfumes. Failure to comply with this step can lead to disastrous results including a patchy tan or even green skin (not a great look!)
The only exception to this rule is the ‘barrier cream method’. This is where you can add a little dot of body moisturiser to particularly dry areas (elbows, knees, knuckles and ankles) by doing this you can avoid a build up of tan in these places – avoiding a patchy end result.
Top tip – if using a barrier cream, opt for something that is fragrance free/unperfumed – the less chemicals being added into the mix the better.
The tanning application
Pump a blob of tanning mousse directly onto your tanning mitt and begin by working the product methodically all over your body. Most people prefer to begin with their legs and work their way up but this is a matter of preference. Work in circular motions, reapplying the mousse to your mitt as you go along. The LJ’s tanning mousse does offer a guide colour so you can see where you’ve already covered. Continue all over your body and then stand back to assess any areas you may have missed.
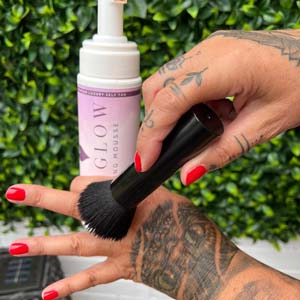
For delicate areas such as fingers, toes and your neck – a kabuki brush works perfectly to give an even look.
Once you’re happy you’ve covered all areas, it’s important to let the tan dry before dressing youself.
Top tip – stand in front of a fan or hair dryer as this can quicken the drying time.
Tanning your face
Your face does not need as much tan product as the rest of your body. Therefore, it’s advisable just to do a quick sweep over this area. Less is most certainly more in this case and if you’re not happy with how dark it is you can always add more later or apply a face bronzer to give another layer of ‘glow’.
We’d recommend using the LJ’s tanning drops on your face. These are best when mixed in with your normal face moisturiser. For an even finish, apply using your hands using circular motions. However, do be sure to wash your hands immediately afterwards!
Wash off the tan
Your fake tan will develop over time, it’s best to leave it on for at least 4 hours (longer if you prefer a deeper colour). Once this time has lapsed, have a quick shower to wash it off. Underneath the base colour there should be a lovely golden bronze.
Maintain your ‘glow’
In order to obtain long-lasting results we’d recommend keeping your skin hydrated. A daily moisturiser will certainly help. Also avoid baths which will soak off the tan and could leave it patchy. A quick shower will be best. Once the tan has almost gone and you’re ready to glow again, just start the process all over again.
If you’re ready to ‘fake not bake’ then follow this link below for our full tanning range.